Analgesia
- Early IN Fentanyl
- Intravenous access (morphine) will be required at some stage
- US guided femoral nerve block
- Allow time for a femoral block to work (10-20 minutes)
- Apply skin traction (You may need gallows traction in smaller children). It is a priority to get the child in traction. If there is an obvious femoral fracture the child should be in traction before imaging
Equipment
- Two people are required
- Different splints: fixed/split ring (and Rt vs Left)
- Fixed ring: short side goes medially
- Split ring: short side goes medially (buckle over outer thigh)
- Skin Traction Kits: These come in 2 sizes (Child and Adult) and 2 types (adhesive and non-adhesive). Generally adhesive is used for children, and non-adhesive for older children and adults. They contain:
- A skin extension and a bandage
- Calico slings & safety pins
- Two tongue depressors taped together
- Tape measure
- Scissors
Preparation
- Explain to child and parents what you are going to do, and why
- Ensure adequate analgesia has been established
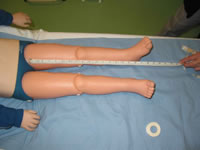
- Measure the good leg from the inner thigh (at the pubis ) and the heel, and add 20-30 cms
- Measure the circumference of the good thigh at its widest part, and add several cms (allow for swelling)
- Select a left or right sided splint, of the correct size. Choose the size closest to your measurements, but round-up
- The frame sizings are usually written on the rings at the top
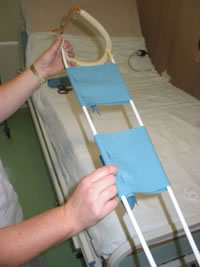
- Apply calico slings to the selected frame by looping them around the steel rods. Secure them with safety pins. Put the safety pins on the lateral side, and at the back, so they are out of the way. Do not use tubigrip (or similar stretchy material)
Procedure
- Apply firm manual traction to the limb maintaining the foot in a dorsiflexed position. Support the knee and thigh
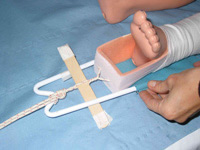
- Apply the skin extension longitudinally around the leg. It should extend to the upper part of the thigh along both sides. The spongy part should be located symmetrically under the sole of the foot, with a gap of 4 cm between it and the foot (to allow for plantar flexion). The foam should extend to cover each malleolus for protection
- The skin traction should then be secured from thigh to the ankle using crepe bandages. It is a good idea to leave the knee and fibula head free from the bandage to reduce the risk of peroneal nerve compression at the fibular neck
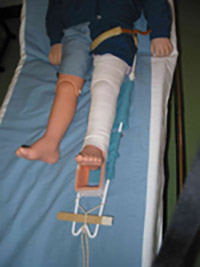
- Whilst maintaining traction, put the frame carefully in place. It should fit snugly into the groin, and up against the ischial tuberosity. In boys ensure testicles are not squashed. The leg should be on top of the calico slings
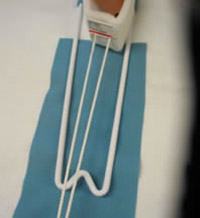
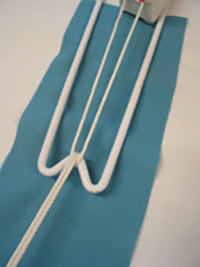
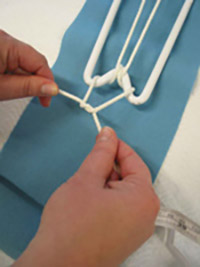
- The traction cords are now pulled tight around the W shape at the bottom of the splint and secured firmly. The taped tongue depressor are inserted between the cords and twisted round several times (used as a Windlass )
Elevate the leg. It is important that circulatory observations are performed after application of the splint (colour, sensation, warmth and movement ), and that the limb is re-X-ray'd.
pubis to heel
and add some
(good) thigh girth
Short side medially
References
- IAEM Guidline Thomas Splint Application for Femoral Shaft Fractures in the ED 2023. Dr Eamonn McMackin, Mr Neil Perry CNF
- Taylor L (1987) Ward Manual of Orthopedic Traction. Churchill Livingstone Royal College of Nursing 2002). A Traction Manual. RCN, London