Setting Up
Equipment Required
- Bacterial Filter
- Circuit tubing( BiPAP disposable circuit)
- Exhalation Port
- Face Mask
Circuit Set-up
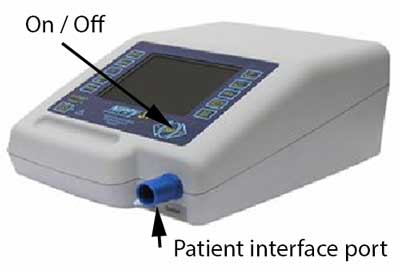
- Connect Bacterial filter to the patient interface port
- Connect Circuit tubing to the Bacterial filter with exhalation port at the patient end
- Attach face mask to exhalation port
Machine Set-up (Refer to Providers Manual)
Switch On
- Place the NIPPY 3 on a clean, smooth, hard surface
- Connect the power lead to the mains power connector on the rear panel. Plug into the mains power supply
- Press the Start/Stop button
To Switch Off
- Press the Start/Stop button. The “Switch Ventilator Off” message will appear on screen. Press the Start/Stop button again after 2 seconds. There must be a delay of 2 seconds before each push, to prevent accidental operation
The Main Screen
The Main Screen is divided into 3 areas:
- The left-hand side shows the basic ventilator settings, IPAP, EPAP, Ti (Timed Inspiration), BACK-UP and Mode, adjacent to its setting button
- The centre section shows the airway pressure, estimated tidal volume and breath rate
- The right-hand side shows the Total hours, hours used and symbols for alarm mute and locked settings
How to adjust the NIPPY 3
- Select the desired parameter with the relevant button
- The reading adjacent to the button will be highlighted by a purple flashing box
- Alter it with the - or + buttons
- When you have finished, move on to the next adjustment or wait a couple of seconds for the flashing box to disappear
E.g. Press IPAP: IPAP setting will be surrounded by a purple flashing box. Press ± to increase/decrease the pressure setting.
Setting up the Nippy 3 ST in Pressure support mode
- Place the NIPPY 3 on a clean, level surface
- Press the Start/Stop button and select Pressure Support mode
- Set IPAP to around 8cm H2O as discussed with the physiotherapist and/or medical team. CAUTION: Avoid starting off with the pressure too high. Start with a low pressure to avoid distressing the patient
- Set desired EPAP as decided by EM team /physiotherapist
- Ensure that the back-up rate is set to a lower value than that observed when assessing the patient
- The patient may now hold the mask to the face
- Allow the patient to get used to the mask. Then gradually increase the IPAP setting until the patient feels comfortable and is being ventilated efficiently. 10 to 20cm H2O will suit most patients
- Make sure that no air is leaking from the mask into the patients eyes. If it is, adjust the mask and headgear until air stops leaking into the patients’ eyes. See the instructions supplied with the mask
NOTE: A small amount of mask leak is normal and acceptable. Large mask leaks or eye irritation from an air leak should be corrected as soon as possible.
Lockout Deactivation. If the keypad is locked out, to deactivate, press and hold the up and down arrows at the same time for 5 seconds.